For the first part of this lesson we will be working with data encased in an array of objects and, once again, that data is all about you guys.
Load ALL the data
- Create a new html file and save it. You pick the name. Add
<script src="https://cdn.jsdelivr.net/npm/vue/dist/vue.js"></script> underneath your <head> tag to bring in the vue library. Be sure to add the closing </script> tag. - Create a div in your html with the id of 'us' .
- Download your data and unzip it. A file named youguys.js should appear. Drag youguys.js into the same folder as your new html file and connect it to your html file.
- Open youguys.js with brackets and look inside. At this point all that is in there is one big object with data about, well, you guys.
- Create a new Vue object in youguys.js. Set el to '#us' . Add data to your vue, create a variable of data named yall, and set its value to the big data object with all of your info. Confused? See crutch below 🙂

- For our first performance, we will use v-for to output everyone's first name. The screen capture below shows the approach that I took.

- Once you have successfully displayed everyone's first name, do the same for everyone's last name by using another set of double curly brackets {{ }} to extract the last_name values. BTW, if you leave a space between them , the first and last names will not be 'stuck together'.

- Now bring in the 'fact' values for everyone, but do so just after the </h2> tag.
- Finally, bring in everyone's picture.
- Create a new variable named dompart1 with the value of "http://" and another new variable named dompart2 with the value of "/images/me.jpg" as shown below.

- Now put it all together in the html file.

At this point you should see names, facts and images (owl photos in some cases) for everyone in the class.
- Create a new variable named dompart1 with the value of "http://" and another new variable named dompart2 with the value of "/images/me.jpg" as shown below.
Use a Vue method to load data sequentially
Bringing all of that data into webpage at once was kind of fun, and potentially useful. In this exercise, we are going to use a method (AKA function) to bring in just one student's information at a time when a button is clicked.
- Remove or comment out everything inside of the #us div.
- Add three new variables to the Vue's data: image, stuname, and counter, as shown below. We will use each of those variables in the method that we are about to construct.
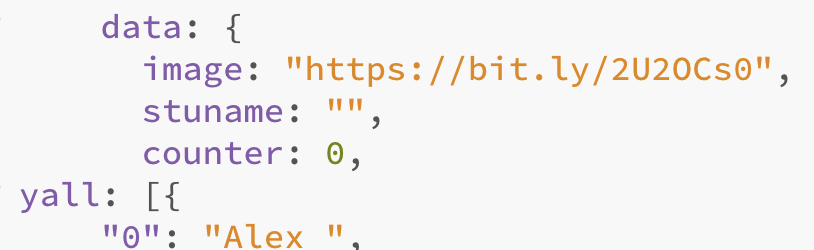 https://bit.ly/2U2OCs0
 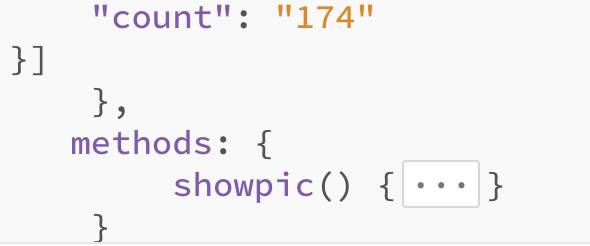 Add 'methods' to the studentdata Vue and create a method named showPic inside.
- Add <h2>{{stuname}}</h2> to the #us div tag. At this point the value if stuname had a value, the value would appear between those h2 tags when you preview your document.
- Add the code below between the brackets of the showpic function.

- Now add a button to the div tag with the "us" id (deleting all of the previous stuff) and call the function.

- Test it. When you click the button, the name of the first classmate in the list should appear. Click again, and again, and again, and the SAME name will appear every time until we increment the counter variable, which is currently set to 0. To achieve that goal, add this.counter++; to the last line of your method. Now you should be able to click your way through all first names.
- But what if you want both first and last names? Easy, add the last_name value to the stuname variable.

- Finally, we need our images. Add the image variable to to your html. Now you should most likely see a very famous chimpanzee.

If you don't see the image, you may have entered the image address incorrectly. It should be https://bit.ly/2U2OCs0 . - To make the images appear sequentially, add the code shown below to your function, just above counter++.

- At this point, you should see a different student's first name, last name and image (except for the 'wise' ones who deleted their images), each time you click the button. But one thing is still missing. What happens after the last student appears? Give some thought to how you could modify your function to resolve this problem. Hint: it has to do with a conditional statement that uses the length of the 'yall' array to reset the counter to 0.
While we're at it: How about a dropdown list?
We worked a bit with dropdown lists in a previous lesson or two where we used plain, unadorned javascript to populate the <select> and <option> tags with data from Javascript objects. This time we are going to build, and access values from a dropdown list with Vue data, methods and syntax. Will it be any easier? You can be the judge.
- Delete or comment out everything in the #us div except <img :src="image">. We are going to put that image call to work in a bit.
 Add the select element with option tags.
- Now add the code shown below to your <option> tag, which uses v-for to loop through all of the value in yall to populate your options with the first name of each student.

- Test it. If everything went well, a dropdown list full of names should appear.
- So far that list doesn't do anything. Time to change that. Create a new value in your data named oswald and set it's value to "nothing yet" . By the way, if you are wondering why I named the variable oswald, I did so to avoid using something suggestive like 'selected' which could have led you into thinking that the variable name actually matters.

- Now use v-model to bind the oswald variable to whichever value is selected.
 .
. - In order to display that value when a selection is made, add
<p>{{oswald}}</p> underneath </select>. Test it out. Each time you select a name it should appear. - But who cares? Right? The real value is being able to use those names to display or do something interesting with the other values. For that to happen, we need to add a value to each of our options. The screen capture below shows how to add each student's image url as an option.
 in case you can't read that screen capture, the last part is shown again below.

- Test it again. Now that the dropdown list has actual values, it ties them to the oswald variable instead of the names that appear between the <option> and </option> tags.
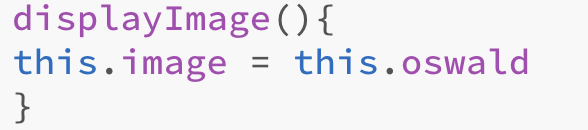
- We are getting REALLY close to being able to see those images. First, we need to create another method. Underneath the showpic method that you created earlier, add a new one named displayImage. Be sure to separate the two methods with a comma.

- Now call displayImage as shown below.

If we were still thinking like conventional javascript jockies, we would be adding a line of code to our method similar to document.querySelector('#showpic').innerHTML= "<img src="+theName+">";
STOP! We're not going there!
this.image = this.oswald; is all that you need to add to your method. That's it!
Your Turn. 'Vue' the cats
Time to prove that you actually know this stuff. Download this array of objects that contains urls to 15 cat pictures. Create a new Vue and html file and use the same techniques that we just learned to make those kitty pictures appear!