Class Exercises
By now you should have covered a LOT of content, especially about forms, and it's time to put some of it to work.
Exercise 1: Basic form elements
- Create an html page named form1.html.
- Use a <header> tag right after the <body> tag and enter the words "Form Practice" between the <header> tags. Use css (internal is fine) to set the font-size of <header> to 24px. Feel free to set a background color, change the default font color to something else, etc.
- Enter a <main> tag below the header tags.
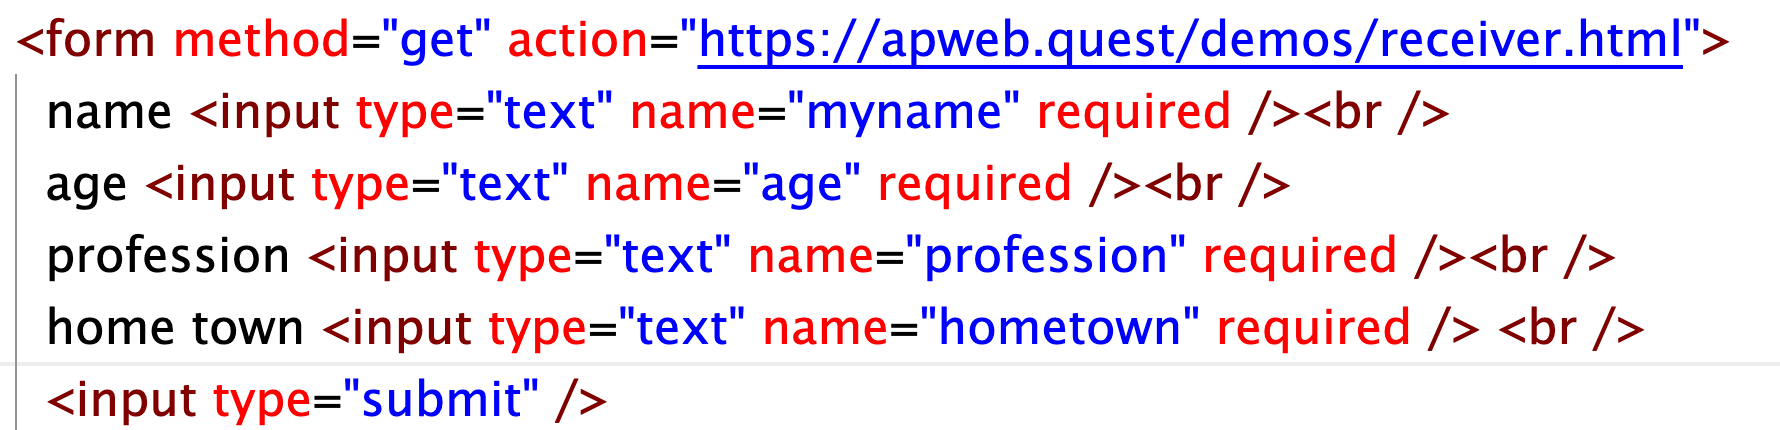
- Create a form in the main section. Set the action of the form to "showme.html" (action="showme.html") and the method to "get".
- Add a standard text input field to the form with both name and id set to "firstName" (id="firstName" name="firstName").
- Add a second text input field with id="lastName" and name="lastName".
- Add yet a third email input field.
- Add a textArea field and set the id name and label to comments.
- Create labels for each text field. Be sure and use the label element as in <label for="firstName">First Name:</label>
- Add a submit button.
- Create another html document named showme.html and save it into the same folder. This file will receive that content that you post (although it won't actually do anything with it :).
- After saving the document, open it in a browser, fill out the fields, and submit it. If everything works properly, showme.html should appear. Take a look at the URL address window where you should be able to see all of the information that you just submitted, appended to showme.html.
- Just for fun and to show the kind of things we will learn to do later in this course, let's take this exercise a bit further. Modify your form so that it matches the screen capture below, fill out the form and submit it. If you do everything right, the target URL should take the four data elements and, with a little help from Javascript, integrate them into two short sentences.
Exercise 2: More complex form elements
- Save form1.html as form2.html. Erase all content between the form tags, except for the submit button.
- Create a dropdown select box with at least three items.
- Create an autocomplete box based on something that interests you.
- Create a fieldset with at least three radio buttons.
- Create a number input type. Feel free to use the example from the form attribute page but modify it to become something original.
- Save your document, submit it and, once again, take a look at the url to see what the content looks like.
Exercise 3: Even more complex form elements
- Save form2.html as form3.html. Erase all content between the form tags, except for the submit button.
- Add a slider to your form. In this case you can follow the form attribute page's example verbatim. Use the javascript they provide for visual feedback by placing it within <script> tags at the bottom of your document. Test it. If everything works properly you should be able to see the values as you move the slider.
- Time for a challenge. Add a color picker (that part is easy). Now take a long look at the html and especially the javascript that provided visual feedback for the slider element. Try to come up with a way to provide visual feedback for the colors that you choose! If you approach this task logically and with a sense of fun, it may not be that hard!
Exercise 4: The real thing (PHP/MYSQL)
Data from forms is frequently sent to a PHP file, which communicates with a database and tells it where to store the information. In this lesson you will target a php file that is already set up to receive your data and send it to a database. All you have to do is set your form up to target the php file and correctly name the elements of your form.
- Save form3.html as form4.html. Erase all content between the form tags, except for the submit button.
- Change the action of your from from action="showme.html" to action="https://nmidev.xyz/db5/receiver.php".
- Add three input text fields. Set the name of the first text field to name="yourname", the second to name="yourage", and the third to name="hometown".
- Test your document, fill out the text fields and submit it. You should receive a short message telling you that you were successful.
- Now visit https://nmidev.xyz/db5/students.php to see if your information actually appears!
Exercise 5: Javascript and form elements
Later in this course we will learn a great deal about how javascript can do things with form data, such as giving feedback, accessing additional information, changing the look of the webpage, etc. Two main points that you should take away from this exercise is that
- javascript only cares about the form elements themselves and has no need for the <form> or action tags and
- forms provide a useful gateway for user interaction.
We are going to make this one REALLY easy. Simply paste the code below into an EMPTY document, save it as jform.html, and put it to the test. Basically, all we have done here is provide one text field with the id tag of 'name' and a button with the id tag of 'clickme'. Now take a look at the javascript (between the <script> tags).
-
-
- First, in step 1, we create variables that use document.queryselector to select #name (the text field) and #clickme (the button).
- Then we create a function named getVal that grabs the value of #name and sends an alert message. The final line, whichBut.onclick = getVal, calls the function. This is a very minimal use of javascript and forms but we have to start somewhere :-). If you are feeling mildly ambitious, try adding "hello" to the feedback. If you are even more ambitious, try creating a space such as a span or div tag where the information entered into the form will appear on the page. You may have to search ahead in the workbook or elsewhere to accomplish this step!
-
<!DOCTYPE html>
<html lang="">
<head>
<meta charset="utf-8">
<title>J form test</title>

</head>
<body>
<label for="name">Name:</label>
<input type="text" id="name" name="user_name">
<button id="clickme">value</button>
</body>
</html>
<script>
// step 1. on the next two lines we tie IDs to variables
var formVal = document.querySelector('#name');
var whichBut = document.querySelector("#clickme");

// Here we create the getVal function
function getVal() {
alert (formVal.value);
}

//Here we activate the getVal function whenever whichBut is clicked
 whichBut.onclick = getVal;
</script>
</body>
</html>