As the title suggests, this lesson focuses on style and class binding, as well as computed properties. By now you should have been introduced to all three of these methods in your homework at Vuemastery, but the concepts are challenging enough to merit reinforcement.
- To begin, download this zip file, which basically contains a clean version of the first exercise in the previous lesson. When you open the html file, studentDemo.html in your browser, all student names, pictures and quotes will appear.
- Unzip and drag everything into your work folder. Open both files in your editor's split view.
- To start our journey let's start with something radical and use style binding to change the background color of our h2 tags. Warning: this is going to be ugly.
- Add bgColor: "red" to your data section. Next, bind bgColor to your <h2> tags as shown below and refresh your browser. Hideous long, thick red line, right?

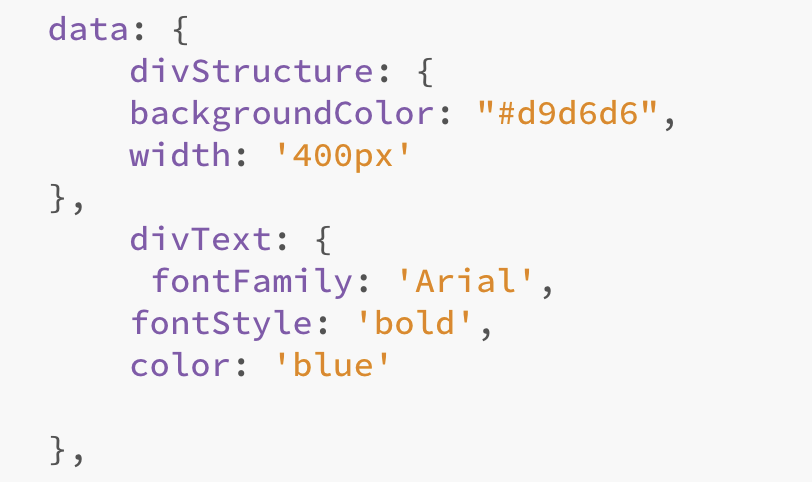
- Change the value of bgColor to something more subtle such as bgColor: "#d9d6d6" (a nice light grey) and move your style binding to the div tag instead.
- Now pretty much everything on the page appears light grey, so let's create a new value, divWidth to add width to our div as well


- You could add as many css values as you like simply by separating them with commas and creating the value in your data, but that could get pretty clunky, which is why the folks at Vue invented class binding. In your data, create a new variable named myDiv and populate it with values as shown below. Then add it to your html by modifying your :style= statement.


- It is also possible to apply multiple values at once by creating and applying more than one object that contains multiple css properties. Delete myDiv from your vue and replace it with these two variables: divStructure and divText. Then add both to your html document.

Spring 2024 Alert! Steps 9 - 11 do not apply to you because there is only one section of 4020/6020 this semester!
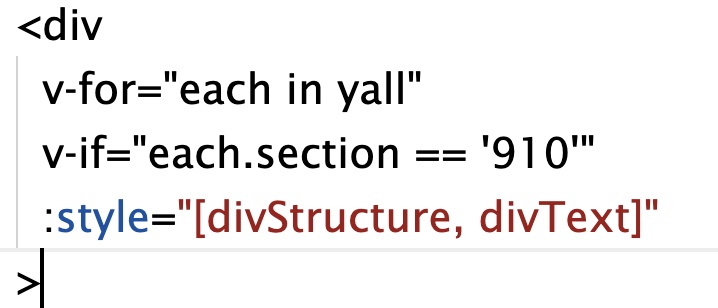
- As we are about to demonstrate, class binding can be useful when you want to use a class to distinguish between blocks of content. We are going to use the section value in the yall array to demonstrate this concept. Before we do so, however, just for grins, let's take a detour back to v-if and use it to eliminate all students from the 9:10 section from our html file. Modify your div tag to match the screen capture below and check out the result. All of the students who are in the 9:10 class should be gone! Now put them back and eliminate the 11:30 section.
- This approach is pretty harsh because we LIKE all of our students, but simply prefer to distinguish between the two groups. Let's begin that short journey by adding two new styles to our css:

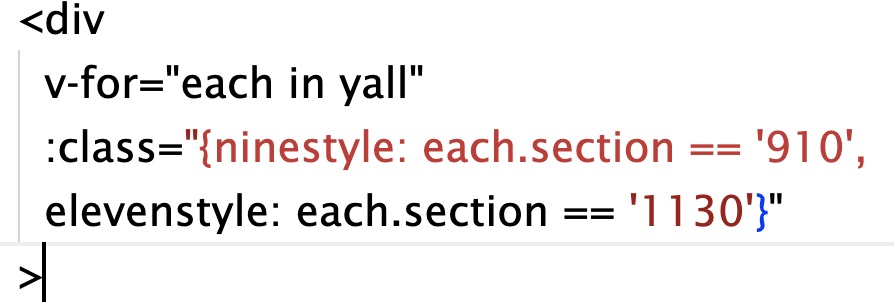
- And now for a bit of class binding. Delete the v-if statement you just added in and replace it with
<div v-for="each in yall" :class="{ninestyle: each.section == '910'}">
as you can see, the divs that contain students from the 9:10 class all have the characteristics specified in the ninestyle class. In order to add the other two classes, simply separate the first conditional statement with a comma, and add an additional and very similar conditional statement after the comma. Now all of our students should be on the page with a background that indicates the class they are taking.
Let's compute something
This compute lesson will be brief but we may revisit compute later on. For now, we are going to use compute to cause one of your names to randomly appear in a header at the top of our document.
- Add a computed section below data as shown below, with a value of title.

- Within the brackets { } add return this.yall[0].stu_name. Now add <h1> tags to the top of your document underneath <div id="us" >, and add {{title} between the h1 tags. Save everything and test. You should see the first student in the list.
- That was nice but we are equal opportunity around here so modify title to match the statement below to randomly select a student's first name.

- Now figure out how to make the last_name value appear as well.
Take the challenge (if you dare)
You learned earlier to bind classes to the property of an object. Now it's your turn to figure out how to bind the same two classes to the property of the property of an object. What??!! Here's the deal. Each of you shared information about yourselves (see fact in yall), but some of you were more loquacious than others. This 'loquaciousness' is represented by the value of length as in eachStudent.fact.length which yields an integer based on the number of letters in the fact string. Your job now is to apply one of those styles to students whose facts have more than 30 characters and the other style to your more reticent classmates whose facts contain less than 30 characters. I recommend that you simply modify the class binding statement that you already have in place.