The inspiration for this lesson came from an NMI Capstone project with the goal of creating an app for ecology students to collect field data about plants. The specs for the app included being able to:
- capture user location
- take pictures of plants
- take field notes
- upload and store the plant pictures
Step 1: User location
Getting the user's location involves two functions. The first function draws on the browser's geolocation property to return a geolocation object. The geolocation object contains a function called getCurrentPosition. The getCurrentPosition function, as its name suggests, pinpoints the user's position to the best of the browser's ability. In my experience, your phone's browser will provide a very accurate position. A networked computer such as the ones we have in our classroom, on the other hand, may give the location of the server that it is connected to. In our case the server is somewhere on South Campus.
The second function, which is called as an argument of the getCurrentPosition function, gets the latitudinal and longitudinal values of the user's position and allows you, the developer to put them to use, by sending them to a map, displaying them to the user, or storing them in a database. We will do all three of those things in this lesson! Enough talk, time to demonstrate how it works!
- To begin, create a new html document. Inside of <script> </script> tags at the bottom of the document, enter the getLocation function as shown below. Take note that an additional function, showLocation is called when we invoke the getCurrentPosition function on the third line. We are about to create it.

-
Now create the showLocation function below. We will add longitude to this function soon, but for now all we want is to prove that we can get latitude and log it to the console. As you can see, it links the variable latPos to the user's latitude and then logs latPos.

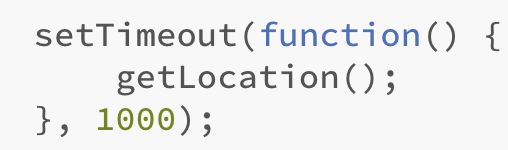
- To make everything work, we have to call the getLocation function. We could call it by clicking a button or something similar, but in this case we are going to use a timed function to call it. The reason for using a timer is that we want getLocation to run automatically in the background after the document is fully loaded. The 1,000 in the setTimeout function equates to one second (one thousand milliseconds). Add the setTimeout function below showLocation.
- Test everything and check your console. If everything works properly, you should be prompted to allow the browser to track your location, and afterward, see a latitudinal value in the console.
- Once it works, add a new variable to the showLocation function named longPos that captures the user's longitude. You should be able to figure this one out without a screen capture.
- Use console.log to prove to yourself that you have values for both latitude and longitude.
- Just for fun, add a div tag to the html of your document and use it to display the user's latitude and longitude. To accomplish this goal you will need to
- add an id to the new div tag
- create a variable for the new id in your javascript code
- use the showPosition function to add latPos and longPos to the innerHtml of the new variable. You've got this .
Create a form
To achieve our objectives of uploading images and storing the user's location, we need to create a form. The form will be used to upload an image and will also include a space to enter notes. After the image is uploaded and notes are written, the same form will submit the image to a php file that will store it on the server. The form will also send the notes and the user's location to the same php file which will ultimately store that information in a database!
The screen capture below illustrates the elements that the form will need. As you can see, when the submit button is clicked, the form will send information to a file named upload.php. The second line <input type="file" name="image"> will give access to the phone's images and camera. The next two lines, text and textarea, are for entering field notes. 
Store latitude and longitude in hidden inputs
The two hidden inputs in the form that you just created are for storing the latitudinal and longitudinal values that we acquired in the previous step. Modify the showLocation function as shown below to add those values to the hidden inputs. When you submit the form to the php file that you will create in the next step, those values will be sent to the same the file to be processed further. 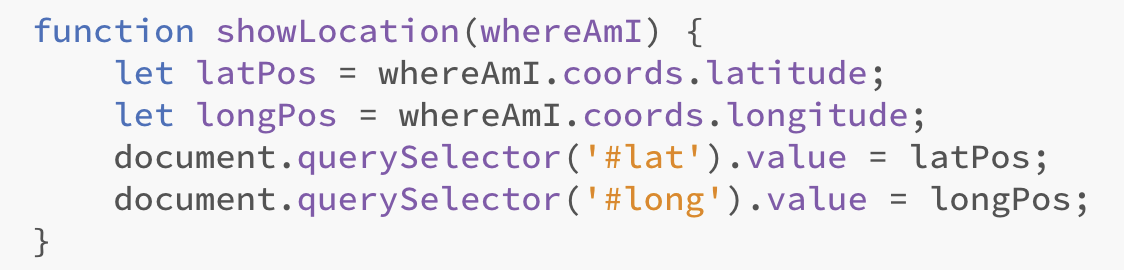
SUBMIT DATA TO A PHP FILE
In this section we are going to run fairly quickly through the process of passing data from an html form to a PHP file and using the PHP file to upload an image. In the next lesson after this one, we will learn how to send this information to and retrieve it from a database.
Both lessons provide a very cursory introduction to PHP, a complex coding language that has been around for many years and only runs on a web server. If you try to run a PHP file with Bracket's live preview, it won't work! You have to upload the html file with the form and the PHP file that you are about to create, to a web server and browse to them in order for them to function.
-
-
- Create a new file in the same folder as the html file you created earlier and name it upload.php.
- Follow the screen capture below to commence your construction of upload.php
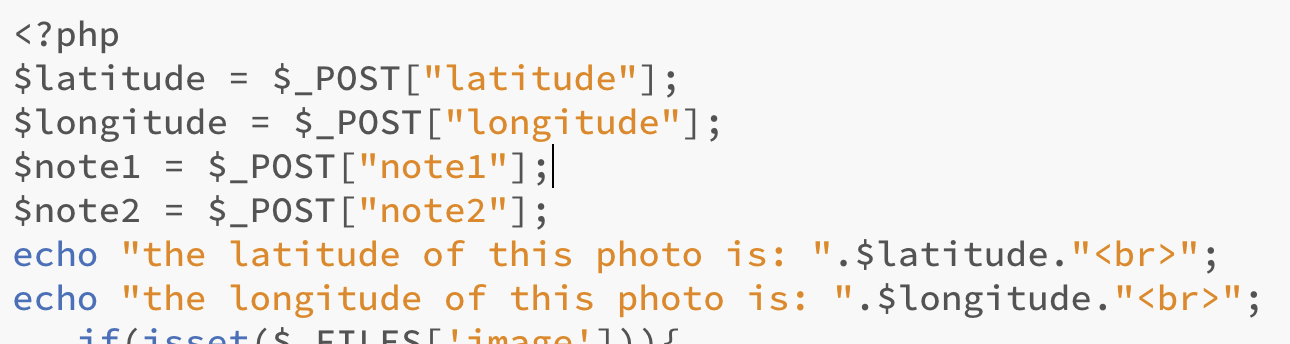
- The first line <?php tells the server that it is about to encounter a block of code
- Line 2 creates a new variable, $latitude and sets it to the value of latitude that was posted from the html file. If you will remember, when you created the form in the html file, the method was set to post, as in method="POST" . Any value that is posted to a PHP file can be captured by using $_POST as in $_POST["latitude"].
- The next three lines capture the additional values that were posted from the form.
- The last two lines use the 'echo' command to write the values of $latitude and $longitude to the browser window.
- The rest of the code that you need is too extensive to painfully type in by looking at a screen capture. So here it is (below). Just copy and paste in! Most of the code is dedicated to uploading the image and saving it on the server. If you read through it, you will notice that there are restrictions on both file size and type. Near the bottom, you will see a line that begins with echo "<br><a href . That line concatenates the values for latitude and longitude into a link that leads to a google map of the same location.
if(isset($_FILES['image'])){ $errors= array(); $file_name = $_FILES['image']['name']; $file_size =$_FILES['image']['size']; $file_tmp =$_FILES['image']['tmp_name']; $file_type=$_FILES['image']['type']; $file_ext=strtolower(end(explode('.',$_FILES['image']['name']))); $extensions= array("jpeg","jpg","png"); if(in_array($file_ext,$extensions)=== false){ $errors[]="extension not allowed, please choose a JPEG or PNG file."; } if($file_size > 12097152){ $errors[]='File size must be less than 12 MB'; } if(empty($errors)==true){ move_uploaded_file($file_tmp,"images/".$file_name); echo "<br>The name of the photo is <a href=images/".$file_name.">".$file_name."</a>"; echo "<br><a href=https://www.google.com/maps/search/".$latitude.",".$longitude."/@".$latitude.",".$longitude.",13z>See Photo Location </a>"; }else{ print_r($errors); } } ?>- Use Cyberduck to create a new folder inside of public_html named data.
- Upload both files into the data folder.
- Inside the same data folder, create a new folder named images. This folder will receive the images when they are uploaded.
- Browse to the html file and test things out!
-