Computed properties are yet another important tool that a budding Vue developer such as yourself should know how to use. They work a bit like functions in that you can combine variables and perform mathematical functions, but you don't have to call them. Instead, you simply enter the name of a given computed property into your html with double brackets.
- We will start with a really simple example. Download this zip file, unzip it and move it into your work folder. Open both files side by side in your editor. BTW, we perform these steps so often in this class that I feel like I should invent an acronym for the process!
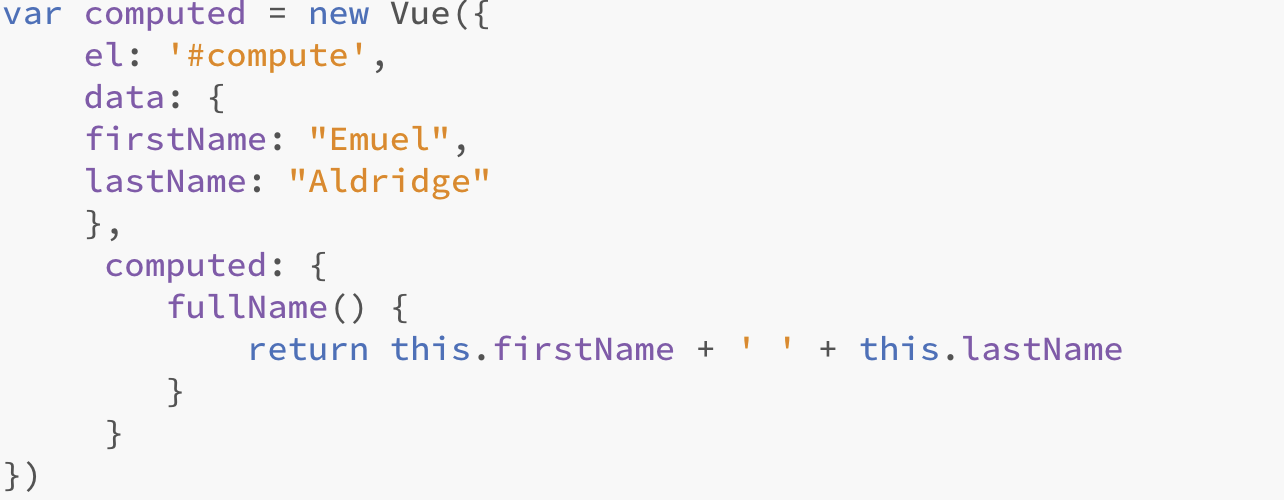
- the computed.js file has two variables in its data: firstName and lastName. We are going to join those two into one computed variable.
- Change the value of firstName and lastName to your first and last names. Now follow the model below to created a computed variable named fullName.

Now add fullName to your html file, save everything and test it out. That's it!
- Let's move on to a slightly more complex demonstration of computed properties.
- Download THIS zip file, unzip it and move it into your work folder. Open the file named studentDemo.html in your browser and a list of your names should appear. That list is generated from the same studentData Vue that we have used in lots of other exercises. The only difference is that we are outputting only names. Our goal is to create a scenario where moving your mouse over someone's name will use a computed property to make their image appear.
- Take a look at studentDemo.html. You will notice that inside of the #us div is another div named #container. Look at the CSS and you will see that #container has a width of 400px and floats left. Just after #container is <img :src="image" /> which calls a currently non-existent variable named image.
- Let's create image as a computed property, using the screen capture below as our guide. You should add the computed portion after your data ends (don't forget the comma) and just before the last two brackets }). Once everything works properly, someone's image should (hopefully) appear on the screen.

- Take note that our image is being drawn from the first object in the yall array because if you take a look at the data you will see that counter is set to 0. At this point, if you test your work, you may see the image of the first student in the list in your browser.
- From this forward out main task is figuring out how we can get the value of counter to change based on the name that our mouse moves over. This process has three major steps.
- The first is to modify our html as shown here by adding a new variable, index, to v-for. This index value will correspond to the person whose name you mouse over and generate an integer (0 1 2 3 etc.) based on the relative position of the persons's name (first, second, third etc)

-
Step two is to call a function on mouseover, named showImage. The showImage function does not yet exist, by the way, but the important takeaway here is that it will have an argument and we are passing the value of 'index' to that argument.
- Now we need a function. Visit youguys.js and add the showImage function depicted below. We are setting the value of counter to the argument of our function. That argument in turn, takes on the value of the student's relative position when your mouse moves over their name. We named the argument index as well, but you could name it Amanda if you wanted to and it would still work!


- The first is to modify our html as shown here by adding a new variable, index, to v-for. This index value will correspond to the person whose name you mouse over and generate an integer (0 1 2 3 etc.) based on the relative position of the persons's name (first, second, third etc)
Take the modest challenge
This challenge truly is modest given that everything is set up for you. Create a new computed property named quote and use it to make each person's fact appear on mouseover as well.