Note from Emuel. This lesson was created by Maryanna Reed in Fall 2019, when she was taking this course, 5110, and Capstone simultaneously. The rest of the words in this lesson are hers.
I worked on this Capstone project with Emuel, and I used many of the skills he taught us earlier in the semester to display the image, notes, and Google Maps URL of each plant entry in the database. While there are many ways to accomplish this task, in this lesson we are going to follow the method that I employed, which includes using a JSON feed from the database.
Step 1: Create the JSON file
- To begin, create a new file in your data folder and name it json.php. This file will be structured very similarly to the data.php file we previously created, so go ahead and have that open. Copy everything above $imgURL and paste it into json.php.
- Next paste this code directly below:
$resultArray = array();
$tempArray = array();

while ($rows = mysqli_fetch_array($get_data)) {
$tempArray = $rows;
array_push($resultArray, $tempArray);
}
echo json_encode($resultArray);
mysqli_close($connection);
?>
This creates an array for the entries in our database, which we can use to display each object.
- If you visit the URL of your JSON file (http://yoursite.com/data/json.php) you should see a JSON feed of your database.
Step 2: Create the HTML and JS files
- Create a new HTML file in your data folder and name it data.html. Make sure you include the jQuery library by adding the following code below the <head> tag.
<script src="https://code.jquery.com/jquery-1.9.1.js"></script>
<script src="https://code.jquery.com/ui/1.10.3/jquery-ui.js"></script>
- In the <body> of data.html, create a div tag with an id of plants. We'll come back to this in a minute.
- Create a new Javascript file and name it data.js. Make sure you link to this Javascript file in your data.html.
- Now we're going to use the skills we learned from Assignment 3 to complete the fun part: displaying everything in our database!
Step 3: Setting up the variables
- In data.js, create a new variable called plantLoad and set it equal to the id of the div tag we made in the HTML file. (Hint: use a document.querySelector!)
- Next, create a function called showPlants and set plantLoad.innerHMTL equal to an empty string.

- Directly below that we're going to add the get JSON function with the URL of the JSON feed we previously created. This will go inside the showPlants function.

- Inside of the $.getJson function create a for loop that loops the length of the data array.

- Next we're going to create a link to the photo's location inside the for loop. First, create the latitude and longitude variables that sequentially extract the latitude and longitude from the JSON file.
- Now let's create the variable for the URL that displays the Google Map location of each entry and call it latlongURL. Just like the previous lesson, the code is pretty gnarly so you can just copy it here:
let latlongUrl = "https://www.google.com/maps/search/" + latitude + "," + longitude + "/@" + latitude + "," + longitude + ",13z";
- Lastly, we will create one more variable called theLink, which puts the latlongURL in an <a> tag. When you're finished, the variables should look like this:

Step 4: Displaying each entry
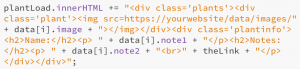
- Now to make each data entry appear on data.html! Below where we declared our variables, start with plantLoad.innerHTML += " ";
- We've reached the stage where you have some creative freedom on how you want to style each entry. However, it's important to make sure that you set up the image and location correctly. I'll show you how I did it, but feel free to use your own method!
- I started with displaying each photo. I started with an image tag with a source equal to the url for each photo in the database.

- Then I moved to displaying the Google Map URL with the location of each plant. Because we created theLink, all we have to do is add the variable somewhere in the above string. I decided to put it last, but it's completely up to you!
- Add the Name and Note data entries to the same string. (Hint: The Name is note1 in the JSON feed and the Notes is note2)
- Now that you have all of the image, name, notes, and map link displayed on data.html, you have some freedom on how you want to style each variable.
- Lastly, don't forget to call the showPlants function at the bottom of data.js!
Step 4: Styling with CSS
- For styling purposes, I started by placing everything in a <div> tag with a class of plants. I then created two divs inside, one called .plant that included the image and a different called .plantinfo that included all of the other information recorded about the plant. (I realize the names for the ids and classes are very similar and can be confusing so feel free to change them!) This is what I ended up with:
- In the <style> tags of data.html I created the layout for the displayed entries. Again, I'll show you how I did it but there are many different ways that you can display the entries!
- Using what we learned at the very beginning of the semester, I used Flexbox to design the layout of the page. I styled the #plants, which includes all the entries, with flex and gave it a background color and some margins.

- I also put a border around each individual entry by stying the .plants class with border: 2px solid #346438; width: 100%;.
- As I previously mentioned, I included separate div classes (.plant for the image and .plantinfo for the Name, Notes, and Map Location entries) to style the individual components of the entries. Because I wanted the photo to display next to the other information, I added float: left to .plant, and then set the width and margin. I then added similar styling to .plantinfo until they displayed next to each other like this:

- Again, this is just how I decided to organize the layout of my project and it's completely up to you on how you design yours. Don't forget to add media queries if you want the entries to display well on mobile too!