Picture yourself
We have reached the point at which it is time to learn how to upload content to the web server. Let’s start by taking your picture, incorporating it into your webpage, and sharing it with the world.
Steps 1 through 4 below instruct Macintosh users on how to get a suitable picture with a built-in program named photobooth. If you are using a Windows or Linux computer, you may or may not have a built-in camera, which means that you are on your own in how best to acquire a digital photo of yourself. An easy fix: use a pre-existing photo of yourself from, perhaps, your Facebook account. However you get the picture, make sure that it is in a jpg format and name it me.jpg before you upload it.
1. Open the Photo Booth. Photo Booth, like most applications, is inside of your applications folder. To get to the applications folder, double click on Macintosh HD. On the left side of your screen you should see a list of devices and places. Under Places, click on Applications.
2. Alternatively, you can use Spotlight, apple’s search feature, by clicking on the magnifying glass in the upper right portion of the screen. Start typing in Photo Booth and click on it when it appears. Once Photo Booth is launched you should see yourself on the screen.
3. You can take a picture of yourself now or click effects to if you want to shoot something funky. I don’t care how funky as long as the picture is recognizable as you. Be advised however, that you and other students may use this picture several times during the semester!
4. With photobooth still open, drag the picture (once it appears) to the images folder inside of the mysite folder.
5. If you like the picture name it me.jpg. Be sure to include the jpg suffix.
6. Reduce the size of the picture. Photo booth takes a much larger picture (i.e. more pixels) than you actually need for this exercise. Pictures that are too large are data hogs that slow down the performance of your website and deplete cellular data plans unnecessarily. Cameras are designed to take pictures that are optimized for printing onto paper where the extra resolution of large pictures can actually make a difference. Having said all of that…
6.a)Double click on your photo to open it with preview. Or open it with another image editor.
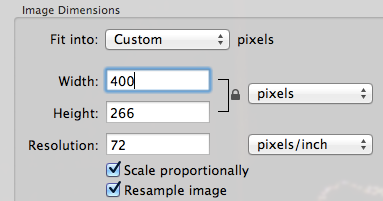
6.b) Click tools and select ‘Adjust size.’
6.c) Set your photo’s width to no more than 500 pixels wide. Don’t worry about the height. Height will take care of itself as long as “Scale proportionally” is checked.
7. Insert the image into index.html. Here’s how.
7.a) Re-open index.html with your text editor (probably vscode).
7.b) Just after the <body> tag add the following code:
<img src="images/me.jpg" alt="my picture">
7.c) Save index.html and view it in your browser. Do you see yourself? If so, congratulations.
7.d) Tell us about yourself. index.html is going to be your ‘home page’ that you use to link to all of your assignments. Since this page is about you, you may want to replace some of the filler ‘lorem ipsum’ text with actual statements about yourself. This website is going to be all about you!